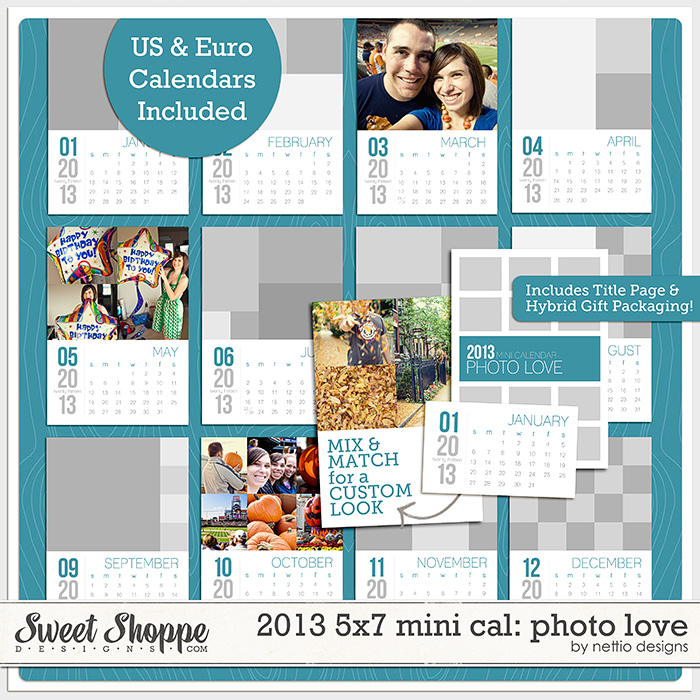
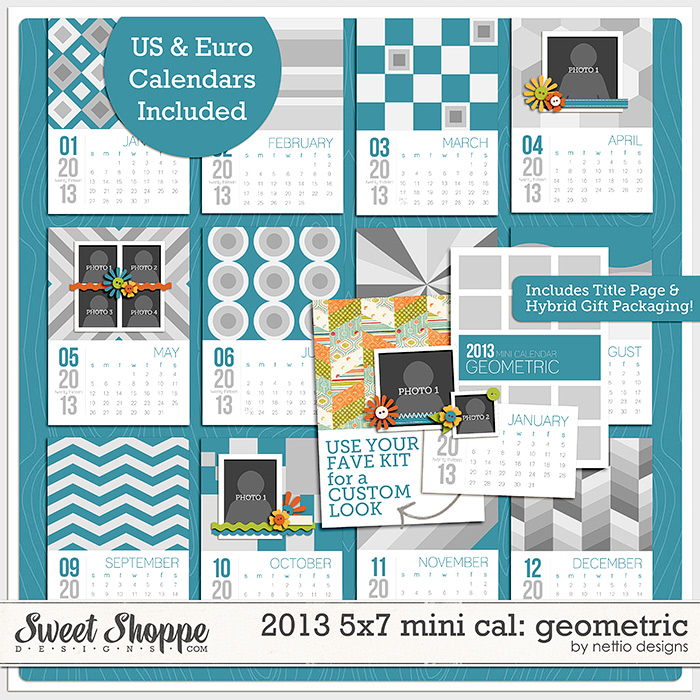
This past weekend over at Sweet Shoppe Designs I released my take on 2013 calendars, my 2013 5×7-inch Photo Love & Geometric Mini Calendars Digital Templates.
These sweet little bits of awesomeness are perfect for making quick, easy and inexpensive holiday gifts but in case you’re a little intimidated by the idea of making your own hybrid Christmas gifts, I’ve put together a little tutorial to show you just how easy it is to customize and print these mini calendars for all you loved ones.
In this post I’m going to walk you through designing/customizing your mini calendars and in tomorrow’s post, I’ll go over how to print your mini calendars and customize the hybrid gift pocket, as well as offer some inexpensive ideas for displaying these calendars all year long.
Ready? Let’s get to it!
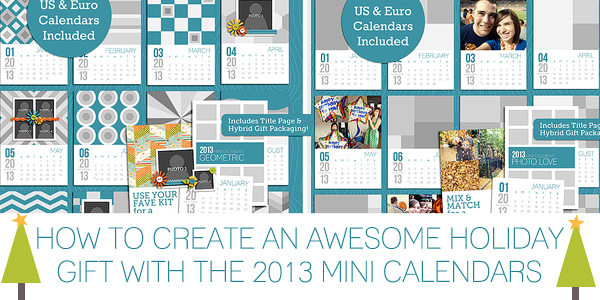
First up, in case you didn’t check out my new releases this past weekend, here’s a peek at what the 2013 5×7 Photo Love Mini Calendars look like…
And here’s what the 2013 5×7 Geometric Mini Calendars look like…
Both sets of 5×7 Mini Calendars are available at Sweet Shoppe Designs and include these key items:
- 5×7-inch layered digital templates for customizing the background of your calendar
- 2013 calendars in both US (Sun to Sat) & European (Mon-Sun) versions
- Customizable hybrid gift packaging and gift tag
- Photo placing clusters (Geometric Mini Cal only)
My goal with these calendars was to create designs that are not only clean, classic and modern but also versatile enough that they can be dressed up or down to fit your personal design style.
The basic process for putting together these calendars is simple and outside of the optional photo clusters included in the Geometric Mini Calendars, the process is the same for both calendar sets.
You start with a layered background which you can customize by recoloring or clipping photos & digital papers to the layers, add in your calendar month of choice, embellish as desired using digital elements and then flatten and print for a finished mini calendar.
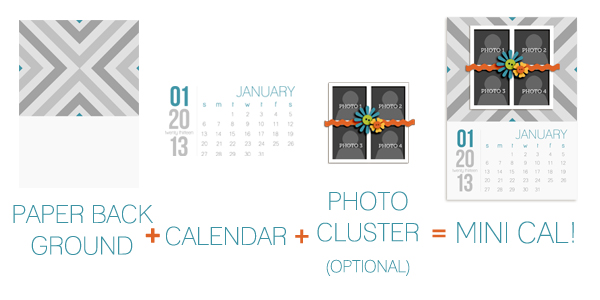
Let’s start with step 1. For my example, I’m going to be using the Geometric Mini Calendars but the steps are the same for the Photo Love Mini Calendar as well.
Step 1: Customizing Your 5×7 Mini Calendar Background
The first thing we’re going to do is customize the background of our mini calendar. This includes adding photos if you’re using the Photo Love Mini Calendar and color or paper if you’re using the Geometric Mini Calendar.
To start, open one of the layered background template files in your graphics program of choice. I’ll be using Photoshop CS3 for my example so if you’re using Photoshop Elements or another program, the steps may be a little different.
When you open the background file layer, it should look like this:
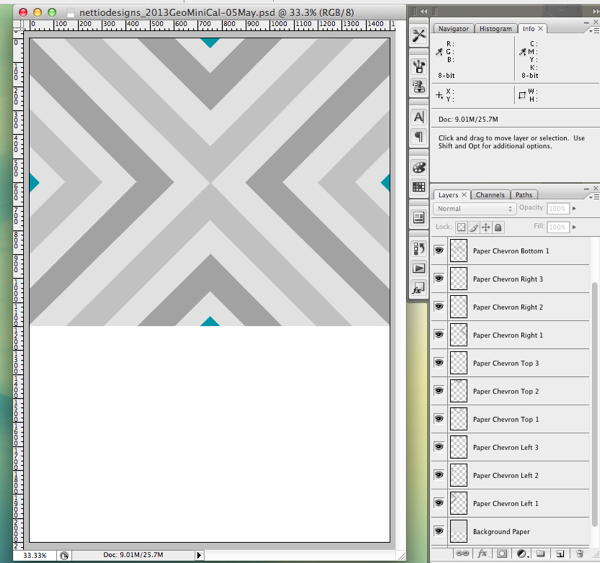
If you’ve used a layered digital scrapbooking template before, it should look familiar to you, just perhaps a little smaller, hehe. But if you’ve never used a template before, no worries! It’s really easy.
On the left of the image is the file we just opened and on the right is your Layer Palette. These shape layers represent the bits & pieces that make up your calendar. Think of them as a digital version of layered pieces of paper – they show you which layers of paper would be placed above and below each other.
In order to customize or move these shape layers, we first have to select the layer in the Layer Palette that corresponds to the the layer in the calendar. The way I like to do this is by using the Auto-Select feature of the Move Tool.
In Photoshop, with your Move Tool selected (it’s the big black pointy arrow at the top of the Tool Palette or use shortcut key V to select it), go to your toolbar at the top of the screen and set the checkbox and drop down to Auto-Select Layer, like below:
![]()
This way to select any layer, all you have to do is click on the shape you want in the calendar file and Photoshop will automatically highlight the right layer in the Layer Palette. So easy!
Now to customize the Geometric Mini Calendar you have two options:
1) You can add color to any shape layer using a Fill or Color Overlay for a clean and graphic look
2) You can clip a digital scrapbooking paper to the shape layer to get a more textured, paper scrapbooking look.
It’s really up to you depending on the look you want, but I’ll go ahead and you show how to do both. If you’re using the Photo Love Mini Calendar templates, you’re going to want to use option 2 since the process for clipping a digital paper is the same as clipping a photo.
Option 1: Add Color Using a Fill or Color Overlay Layer in Photoshop
How To Add Color Using a Color Fill
To add color to a shape layer using the Fill method, the first thing we need to do is select our shape layer. To do this, select the shape layer in your Layer Palette, position your cursor over the thumbnail of that layer and click. Your shape should now have marching ants around it like so:
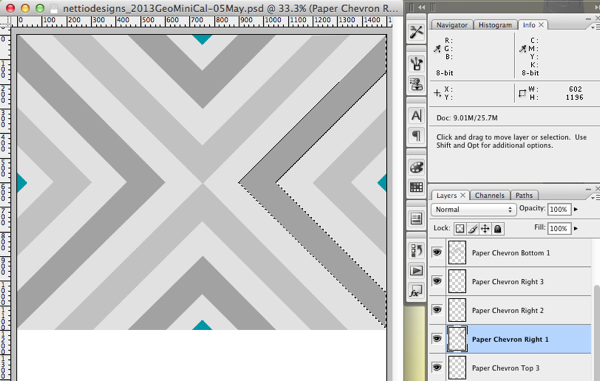
Next, go to Menu Bar at the top of the screen and choose Edit>Fill (shortcut Shift+F5) to bring up the Fill panel. Choose Use: Color and select the color you’d like to use for that shape layer. Click Ok and Ok again.
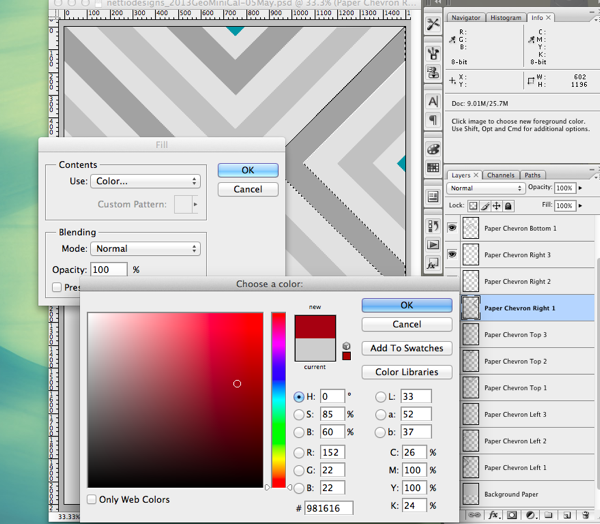
To deselect the shape layer (aka remove the marching ants), use shortcut Cmd/Ctrl+D. Your shape should now be colored like so:
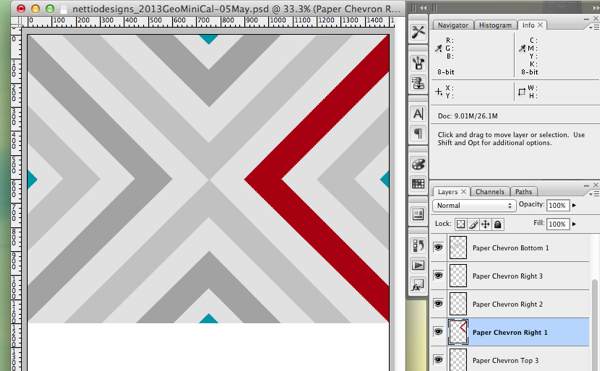
Just repeat these select+Fill steps for each of your remaining shape layers.
How To Add Color Using A Color Overlay Layer Style
As I mentioned if you’re using Photoshop CS+, you can also use a Color Overlay layer style to color your shape layers. This is my favorite way to color layers because it’s quick, easily customizable and I can quickly color other shape layers just by copying and pasting the Color Overlay layer style to those layers.
Here’s how you do it. Select the shape layer you want to color in the Layers Palette and click the Layer Style FX button at the bottom of the palette. Choose Color Overlay.
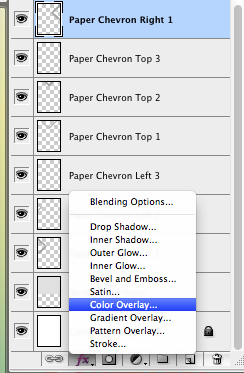
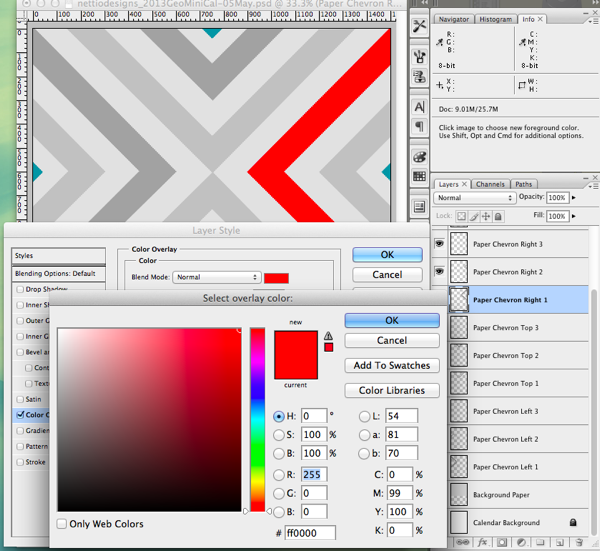
This will bring up the Color Overlay Layer Style Window like so:
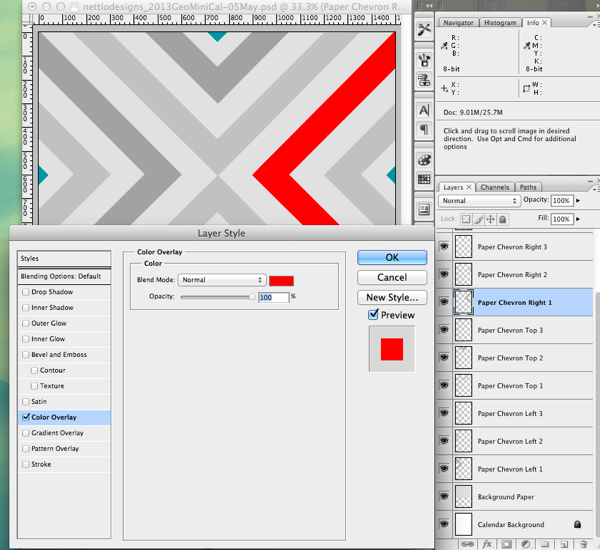
Click on the little red box in the Layer Style window to bring up the color selector window and choose your color. By default it’s a crazy red but you can choose any color.
The nice thing about using Color Overlay is the color in your actual file changes as you select your color in the select color box so you can see how it flows with the rest of your design.
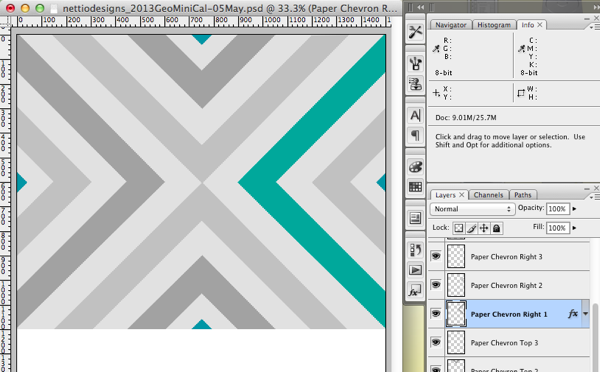
Once you have your color picked out click Ok and Ok again. Your shape layer should now be colored and have a little FX layer style marker next to it’s name in the Layers Palette like this:
Now comes the fun part…let’s say you want to color other layers in your design that same shade you just selected. All you have to do is copy the Layer Style to those layers.
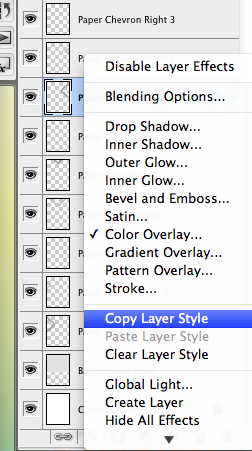
To do this, right click on the FX next to the name of that layer in the Layer Palette and click Copy Layer Style.
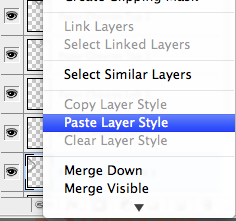
Next select the layer you want to add the Color Overlay layer style to, right click on that layer in the Layers Palette and choose Paste Layer Style:
You now should see multiple layers with the Layer Style symbol next to them like so:
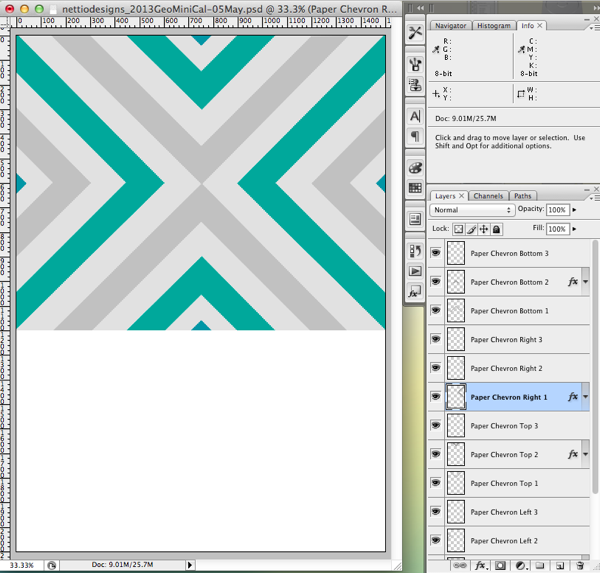
This is the great thing about Color Overlay, you can copy and paste the Color Overlay layer style to multiple layers at once, making it really quick and easy to color your calendars. Just keep in mind that if you add any other layer styles (like Drop Shadows) using style droplets you’ve purchased or saved, they will override your Color Overlay.
You can also copy and paste your layer styles by clicking on the “fx” symbol in the Layers Palette and dragging it to those layers but there’s no easy way for me to get a screenshot of that to show you, haha.
Continue adding Color Overlay layers to all your shape layers until your entire calendar background is colored.
Option 2: Clip Photos Or Digital Scrapbooking Papers to Your Calendar Background
Option 2 for customizing your Geometric or Photo Love calendar is to clip and photo or paper to the shape layer. For my example I’m going to talk about papers since I’m using the Geometric Mini Calendar but if you’re using the Photo Love Mini Calendar, just replace “paper” with “photo” and the steps are the same.
If you’ve ever used any digital scrapbooking template before you should already know how to do this but in case you don’t or you need a little refresher, here’s what you do.
To clip papers or photos to a digital scrapbooking template, we use what are called Clipping Masks. Basically the two digital layers are clipped together and the top layer is “clipped” to take on the shape of the bottom layer. This is the key thing to remember with clipping masks: the shape layer goes on the bottom and the paper or photo goes ABOVE that layer.
First open your desired paper in Photoshop and drag it onto your calendar background. If you hold down the Shift key as you’re dragging, it will automatically center your paper for you.
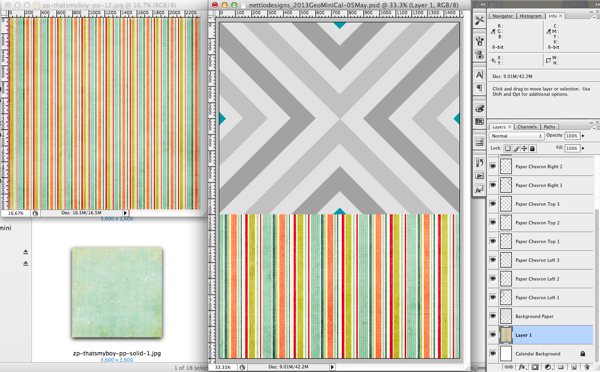
Next move the paper (or photo) layer ABOVE the shape layer in the Layers Palette like this:
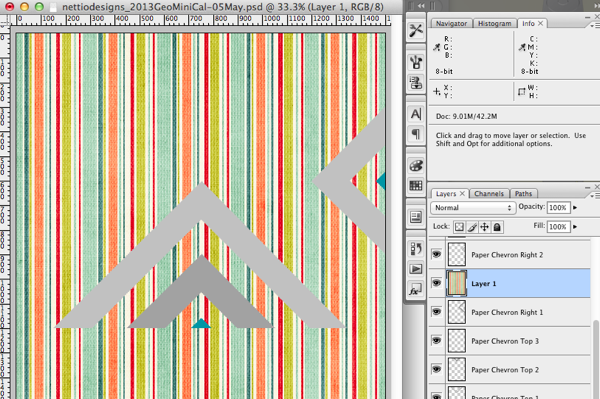
Right click on the Paper Layer and select Create Clipping Mask. You can also hold down the Alt/Opt key while hovering your cursor over the line between the two layers but that’s a bit trickier for me to show.
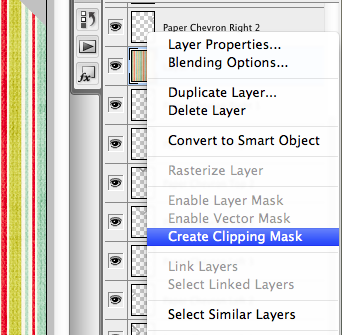
Your clipped paper should now looked like this. In your Layers Palette you should see a little arrow pointing down to the shape layer – that’s how you know the layer has been clipped:
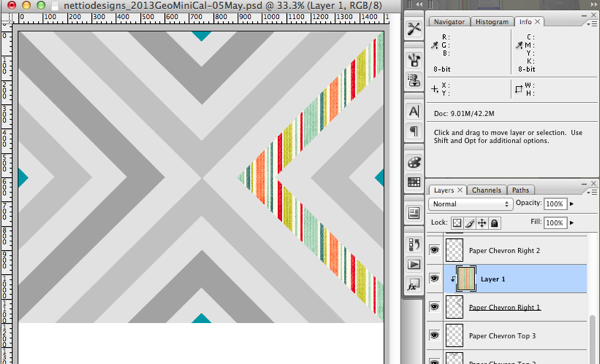
Continuing doing this for all your shape layers until you have the background of your calendar complete. Then move on to Step 2: Customizing & Adding Your 2013 Calendar.
Step 2: Customizing & Adding Your 2013 Calendar
Once you have your calendar background customized, the next step is to add the actual calendar to the calendar background page.
To do this, open up the 2013 calendar month of your choice in Photoshop. I designed each of the calendars as a layered Photoshop file to give you the maximum options for customizing the colors of the calendars. You can either leave the colors as is (which works great for the Photo Love calendar) or you can a Color Fill or Color Overlay using the directions above to change the color of the text layers.
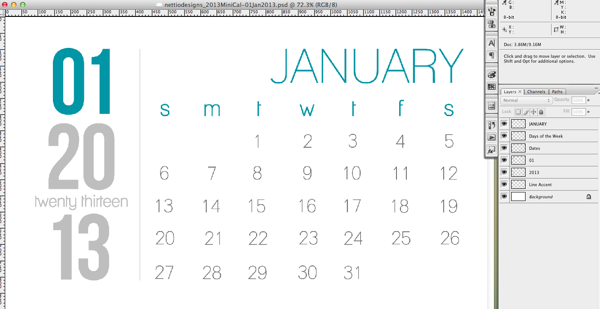
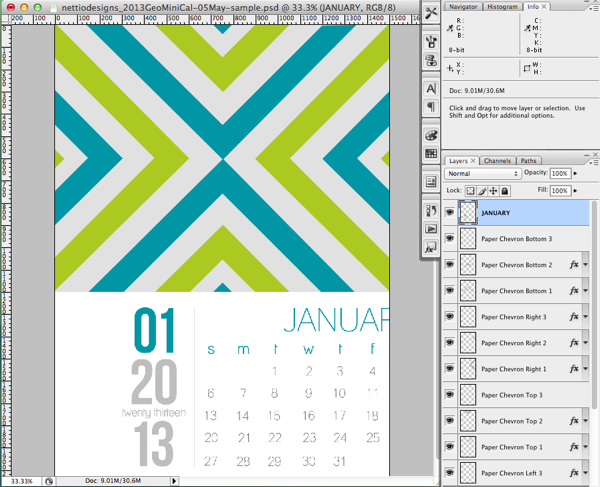
Once you have your calendar customized the way you want, select the calendar layers, right-click and choose Merge Layers (shortcut key Cmd/Ctrl+E). Then drag your merged calendar over to the calendar background like so:
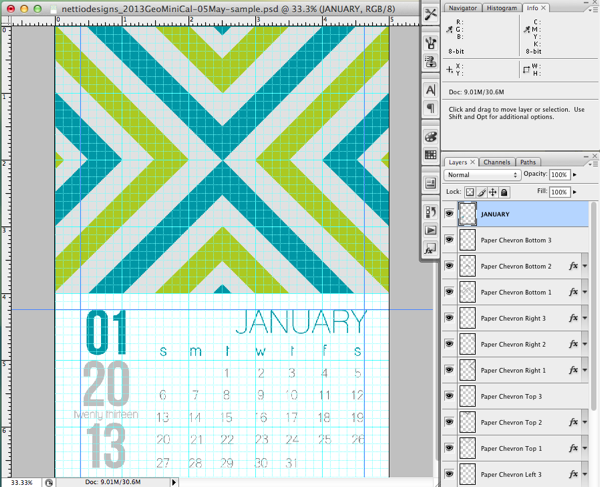
The last step is to center the mini calendar within the calendar area of the background layer. To do this, you can either eyeball it or you can use the grid in Photoshop as a guide. (Go to View>Show>Grid or use shortcut Cmd/Ctrl+’ to turn on your grid.)
Your calendar should be spaced about a .25″ inches from the bottom edge of the background design and about 0.375 inches from the left, right and bottom of the calendar area (see guides in image).
Now that we have our calendar background and calendar ready to go, it’s time for step 3.
STEP 3: Dressing Up Your Mini Calendar (if desired)
The final step of customizing your 2013 Geometric or Photo Love Mini Calendar is embellishment. If you want to keep your calendar modern and graphic, leave your calendar as is and move on to the next step.
But if you’re looking for some ways to give your calendar an extra digital scrapbooking pop, here are a few ideas from my Creative Team:
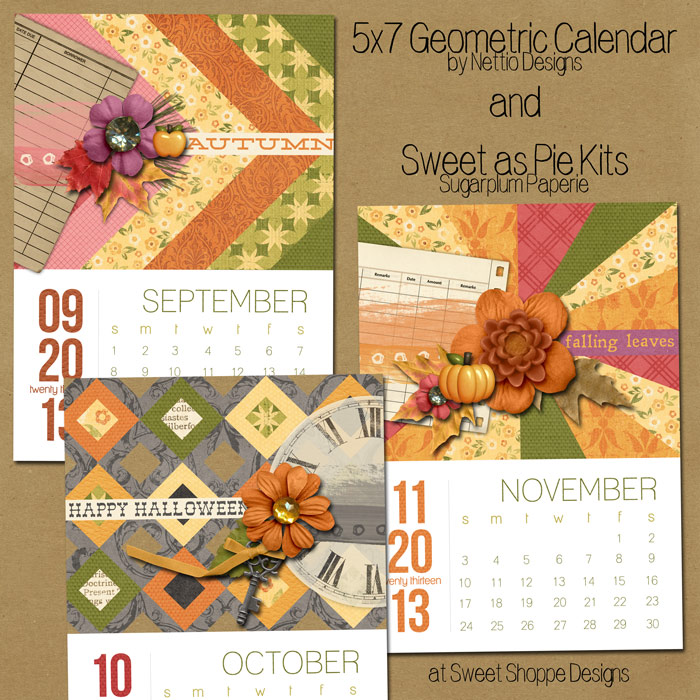
Rebecca used digital scrapbooking products to decorate her Geometric Mini Calendar:
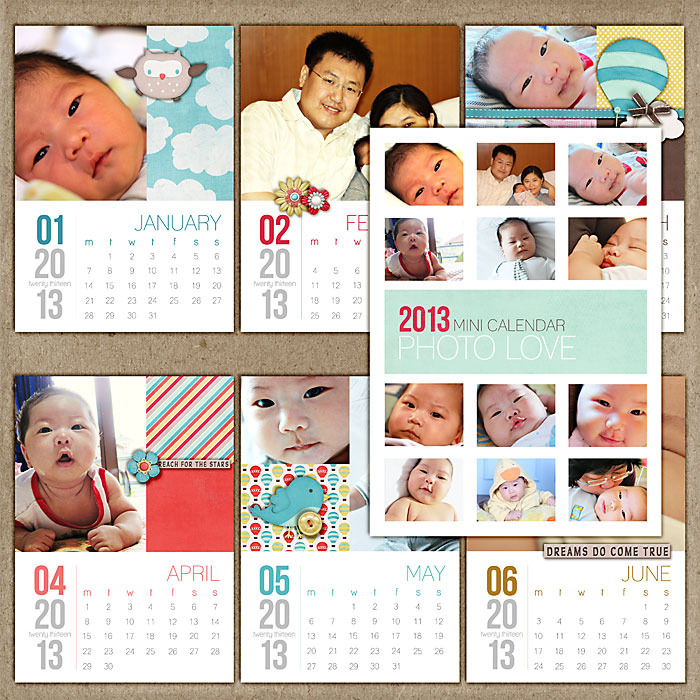
Sherly adding some digital scrapbooking papers and elements to the Photo Love Mini Calendar for a custom look:
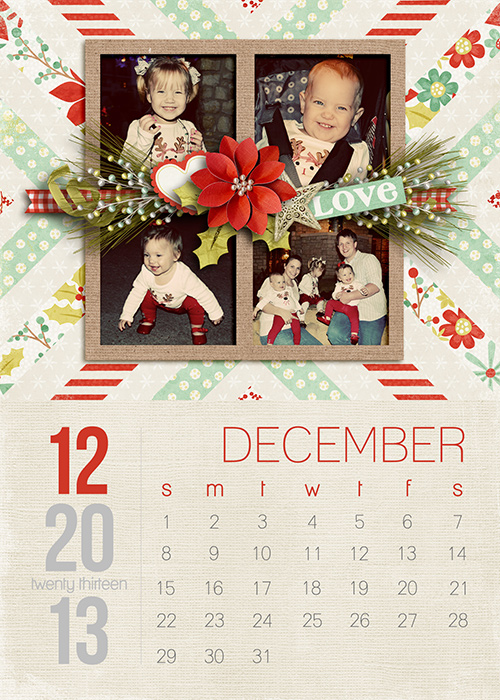
And Natalie used the Geometric Mini Calendar photo clusters to add photos to her Geometric Mini Calendar:
Like I mentioned before, both of these calendars are super customizable so feel free to get creative and show off your mad design skills to all your family and friends.
Well that brings me to the end of Part 1 of the How To Create An Awesome Holiday Gift With the 2013 Mini Calendars tutorial! Stay tuned because tomorrow I’ll show you how to print your mini calendars and customize your hybrid gift pocket, as well as offer some inexpensive ideas for displaying these mini calendars all year long.
As always if you have a comment or question, let me know in the comments section! I’m more than happy to help you out any way I can.
And of course, if you’d like to pick up your own copy of one of these mini calendars, you can find the 2013 5×7 Photo Love and Geometric Mini Calendars at Sweet Shoppe Designs.
