I have been eagerly anticipating June this year for one reason and one reason alone – vacation time!
Adam finally had a rare lull in his job earlier this month so we decided to make the most of it with a nine-day trip to New York City. Although Adam had been to NYC before as a teen, this was my first ever trip to the Big Apple. As a city girl at heart, I could NOT have been more excited!
I have to say I absolutely LOVED New York. Yes LOVED, in all caps. If I could have stayed there forever, I would have. It was everything I expected it would be and oh-so-much more.
Our week-long vacation was jammed packed full of awesomeness including a taping of The Daily Show, the hot award-winning Broadway show The Book of Mormon and even a Yankees vs Red Sox game. (Be on the lookout for a NYC highlights post coming later this week!)
The only downside to the trip? Having to come back home.
Of course I know all good things must come to an end and now that we have returned home, the scrapbooker in me is thinking about only one thing: how I want to document our trip.
As I mentioned during my 5th Scrap-i-versary, one of my scrapbooking goals this year is to document more of our traveling adventures.
I LOVE to travel but these stories very rarely make it into my scrapbooks.
Why?
Because I find the idea of whittling down hundreds of photos and memorabilia into a cohesive album that somehow captures the overall amazingness of our trip completely overwhelming.
Please tell me I’m not the only one.
But I made the decision before we headed to New York that this trip would be my starting point for this goal and I’m going to stick with it. Hooray for goal setting leading to action!
Introducing From Adventure to Album: How To Document Your Trips, Travels and Adventures
Today marks the first post in a new series here on the blog which I’m calling From Adventure to Album: How To Document Your Trips, Travels and Adventures.
I’ll be sharing my process for how I plan to go from travel adventure to completed travel album and breaking down how I deal with photos and memorablia, album design and journaling as well as sharing any other fun things that happen along this album-creating journey.
Since this is my first attempt at an album of this nature, you can guarantee there will be some hits, misses and most likely a few laughs at my expense, haha, and of course I’ll be sharing it all here with you.
To get things started, I thought today I’d share a little bit about what scrapbooking-related gear I take with me when I travel.
My Scrapbooking-Related Gear When I Travel
I will be the first to admit I am a notorious over-packer. I am always struggling to find the balance between packing what I need with what I think I might need.
(Note to self: A heavy winter coat is a NEED in January…even in Florida. Learned that lesson the hard way, haha.)
But when it comes to packing my camera and scrapbooking-related gear, I like to think I’ve gotten it down to an art. Whether I’m driving or flying, traveling by myself or with Adam, what I take with me rarely changes from trip to trip and for the most part I use the majority of what I bring.
Here’s a quick photo I snapped as I was packing for our trip:
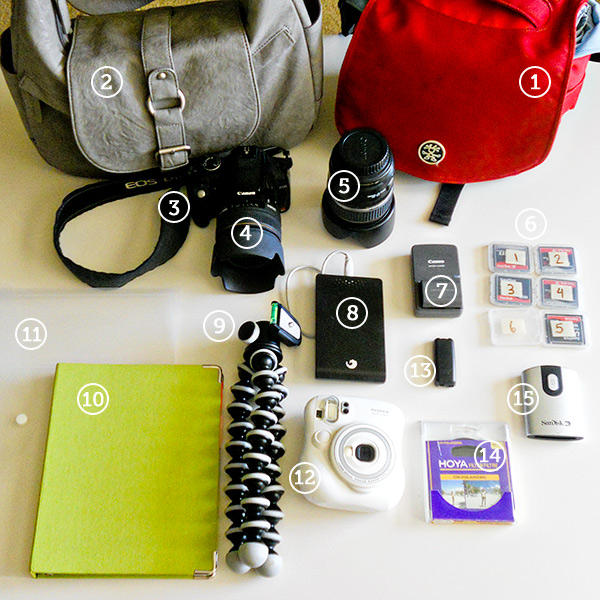
Let’s break it down a bit more, shall we?
1) My trusty 5 Million Dollar Crumpler Camera Bag:
I’ve used this bag as my camera bag for five years now and I love it just as much as when I first bought it. The thick strap and light weight make it super comfy to wear around and the padding provides just enough protection without being too bulky. This baby even kept my camera dry in a typhoon in Japan!
If you have a ton of camera gear, the 5 Million Crumpler may be a bit small for your needs but I’m able to fit my Canon Rebel XT, two lenses (one on the body), an extra battery, camera cards and remote as well as my wallet, keys and phone. It’s a tight squeeze but perfect for my needs most of the time.
2) Kelly Moore b-hobo bag:
The Kelly Moore b-hobo bag is a new addition to my travel gang.
I’ll write a longer review about it eventually (I wanted to wait until after this trip) but in short, I don’t find it to be nearly as comfortable as my Crumpler, especially when using the messenger-style strap.
But it was perfect for those situations where I was dressed up and wanted to carry something more purse-like rather than a camera bag. I also used it while traveling through the airport and it worked great.
3) Canon Digital Rebel XT:
Almost five years old and this beauty is still going strong.
(Well other than a slight snafu when Adam attempted to clean off the inside of the viewfinder with a linty shirt, haha.)
I’m definitely feeling ready for an upgrade but the great thing about this camera is it’s small and light – perfect for when I’m on the go.
Not that that stopped me from ogling the beefier Canon cameras at the B&H Photo Superstore in NYC, haha.
4) Sigma 30mm 1.4 prime lens:
When I’m home, this lens rarely leaves my camera. I love it!
I’ve used it for entire Disneyland trips before in the past but I didn’t use it as much on this trip because the 30mm wasn’t really wide enough for a lot of city shots. It did come in handy indoors, especially in restaurants and at night.
Before we left, I debated about renting a second wider prime lens but I ultimately decided I didn’t want the weight of the extra lens. I think it was the right choice since I wouldn’t have needed it that often and it would have been one more thing to carry around everyday.
5) Canon EF-S 17-85mm 4-5.6 IS zoom lens:
I don’t use this lens at home very much but it is my go-to lens when I travel.
It’s not the fastest or sharpest lens out there but the focal length is hard to beat as a walkaround lens on a crop body like the Rebel XT.
I’d say I used this lens at least half of this trip, maybe more. The wide end was especially useful for capturing buildings and such.
6) Six Compact Flash cards – two 2GB cards and four 1GB cards:
I’m sure I could replace these cards for larger ones at a lot lower cost than what I paid for them five years ago, haha, but I like the small cards because in the event something happened to one of them (like they break or I lose one), at most I’m only loosing a day or half a day’s worth of photos.
The taped numbers were Adam’s doing as a way to help me keep track of which cards I’ve used. Mostly because he got tired of me hunting in my bag for an unused card, haha.
I like to use the 2GB cards first (#5 & 6) so I know if I get to card #4, I know I need to unload my cards before too long. I also now keep the unused cards in a ziploc baggie so when I need to grab a new card on the go, I can easily find one that is empty. (Adam gets a lot less grumpy about my photography this way, haha.)
A bit of camera card advice:
If you’re unsure about how many cards you need for an upcoming trip, I’ve found a good rule of thumb for me is to figure an average of 100 photos per day of the trip.
Of course, your shooting style may be different than mine, but since some days I take more photos than others, it seems to work out about right.
I shoot in RAW so I’m able to get about 100 photos on a 1GB card with my 8 megapixel Rebel XT. 8GB=8 days. Since we were gone 9 days, I ended up clearing one 2GB card off (I used about half of it) to get me through the end of the trip.
7) Camera battery charger and extra battery:
I kept my charger plugged at all times into the base of the lamp so I would see it everyday as we left. No forgotten batteries here!
8 ) Seagate EHD:
When I clear photos off a camera card, I like to back them up to this drive as well so they are in two places – my laptop and the EHD. Just a little bit of extra insurance in case my compy goes wacky.
9) GorillaPod Tripod:
We didn’t use this much this trip since we didn’t want to carry it around but it can be a useful tool in the right situation. I’d like to use it more in the future.
10) Mini Three-Ring Binder
I got this at The Container Store (found here) and I love it because it’s small – just 7×9. It’s great for having a place to right down notes or thoughts as you travel.
11) Plastic pocket for holding papers and memorabilia:
Another item I picked up at The Container Store. It’s 8.5×11 which is perfect for holding any printed papers (we had a lot of e-tickets we purchased ahead of time) as well as being a storage place for any memorabilia picked up through the trip. It was pretty full by the end of the week with all the stuff I collected!
12) FujiFilm Instax Mini 25:
This is a new toy so I’d only used it a few times before our trip but I’m glad I took it with us. The photos aren’t amazing or anything but they have a cool vintage vibe to them that’s pretty fun. I only wish I would have remembered to pull it out more often. Oh well, next time!
13) Canon Wireless camera remote:
Handy for getting shots of both Adam and I together.
14) Hoya Polarizer filter for my 17-85mm lens:
For making sunny skies pretty and blue.
15) Compact Flash card reader:
For emptying my Compact Flash cards since my MacBookPro doesn’t have any card slots. There’s a cord for it too, it’s just not in the picture. I usually keep this in the pocket of the laptop bag along with the EHD and laptop power cord.
A few other items not pictured:
Nikon Coolpix S4000:
My point and shoot camera. We didn’t use the P&S at all this trip but we love it for those times when we don’t want to take a lot of equipment like when we went to the beach in Hawaii.
Apple MacbookPro 15″ notebook:
I was really tempted to not bring my laptop this trip since I’ve found since getting my iPhone, I don’t use my computer as much anymore when I travel. But Adam wanted to bring it so he could look stuff up (he doesn’t like the small iPhone screen as much).
It did come in handy for the one occasion when I needed to clear off my camera card.
iPhone 3GS:
This may be my favorite travel tool ever. We used it for a ton of stuff on this trip: checking into the airline, making reservations, checking subway maps (we used the Kick Lite map), looking up near-by restaurants and reviews.
I also used the Evernote app for keeping track of our schedule, food and activity ideas as well as jotting down journaling throughout the trip (I’ll talk more about this in another post.)
All this really makes me wonder how people traveled before smart phones – it certainly makes things a lot easier!
The only downside to this plan? Adam asking to see my phone every five seconds. I even told him at one point that “Let me see your phone” had become my least favorite phrase ever. I’m thinking I was a bit grouchy in that moment. LOL!
CamelBak Backpack:
This isn’t necessarily a scrapbooking or camera-related tool but I wanted to mention our CamelBak backpack because it’s a favorite travel item of ours.
If you’ve never heard of CamelBak, they’re basically backpacks for outdoor activities – hiking, biking, etc that have a built in container you can fill up with water.
I like ours because it’s large enough that I can fit my Crumpler bag in it (great for consolidating carry-on items) and it’s a great way to carry water around especially in the summer. WAY better than buying $5 water bottles at places like Disney and baseball games!
My last piece of travel advice: don’t assume running shoes make for good walking shoes. I made this mistake on our trip and I paid for it dearly. With my feet. By day 4 I wanted to cry my feet hurt so bad.
If only I’d packed my old time-tested pair of running shoes as a backup like I wanted too before I talked my over-packing self out of it…
So there you have it! A little sneak peek into what I take with me when I travel. Looking at this list it seems like a lot of stuff but in reality it all fits into a couple of carry-ons.
Now It’s Your Turn
So now I want to hear from you! Anyone else excited for June to finally be here? Do you have any fun trips or adventures planned for this summer? What are your scrapbooking must-haves for when you travel? Are you an over-packer or under-packer when you travel? Let me know in the comments!
Psst…paper and elements for the Adventure to Album graphic came from Jenn Barrette and Laura Banasiak’s awesome Leavin’ On A Jet Plane kit. Check it out here.
Can I take Levitra if I am taking other remedies at the same time
